Here’s a detailed, SEO-optimized product post for https://mousehabitat.com/ on the keyword “how to install wireless mouse”:
How to Install a Wireless Mouse: A Complete Step-by-Step Guide
Introduction: Say Goodbye to Wires – Install Your Wireless Mouse Today!
In today’s fast-paced digital world, the convenience of using a wireless mouse is undeniable. Gone are the days of dealing with tangled wires, allowing you the freedom to move your mouse across the desk without limitations. Whether you’re working on your laptop, gaming, or just browsing the internet, installing a wireless mouse is the first step to enhancing your productivity and comfort. In this guide, we’ll walk you through how to install a wireless mouse easily and quickly, so you can start enjoying a smooth, cable-free experience in no time.
Why You Should Switch to a Wireless Mouse
Before we dive into the installation process, let’s take a quick look at why opting for a wireless mouse is a fantastic decision:
- Enhanced Mobility: No wires mean unrestricted movement, giving you the flexibility to work or play from any corner of the room.
- Clutter-Free Workspace: Wireless devices reduce desk clutter, making your workspace more organized and efficient.
- Convenience and Portability: A wireless mouse is easy to carry and use with a variety of devices, such as laptops, tablets, and more.
- No Compatibility Issues: Wireless mice are compatible with almost all devices, from desktops to smart TVs.
With these advantages in mind, let’s get started on learning how to install a wireless mouse.
Step-by-Step Guide on How to Install a Wireless Mouse
There are two main types of wireless mice:
- USB Receiver Wireless Mouse (2.4GHz)
- Bluetooth Wireless Mouse
We’ll go over the installation process for both types, so no matter which wireless mouse you have, you’ll know exactly what to do.
Step 1: Unbox and Prepare Your Wireless Mouse
Before connecting your wireless mouse, you need to ensure it’s ready for use:
- Remove the Plastic Tab: If your mouse is a brand new unit, you’ll likely find a small plastic tab in the battery compartment. This tab prevents the batteries from making contact and draining power. Be sure to remove this tab before proceeding.
- Insert the Batteries: Wireless mice generally run on AA or AAA batteries. Open the battery compartment and insert the batteries, ensuring they’re placed correctly according to the polarity markings.
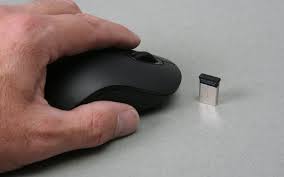
Step 2: Installing a Wireless Mouse with a USB Receiver (2.4GHz)
The most common type of wireless mouse uses a USB receiver. Here’s how to install this type of mouse:
1. Plug in the USB Receiver
Locate an available USB port on your computer and insert the USB receiver that came with your wireless mouse. This receiver is a small device that acts as the connection bridge between your mouse and your computer.
2. Power On Your Wireless Mouse
Flip the switch on your mouse to the “ON” position. You may also notice a small light indicator on the mouse that confirms it is powered on.
3. Automatic Installation
Once the receiver is plugged in and the mouse is powered on, the mouse and the receiver should automatically connect. This usually happens within a few seconds. There’s no need to install drivers or software for this type of mouse.
4. Test the Mouse
Move the mouse around to check if the cursor on your computer screen responds. If the cursor moves, you’ve successfully installed your wireless mouse.
Step 3: Installing a Bluetooth Wireless Mouse
If you have a Bluetooth wireless mouse, the installation process is a bit different. Here’s how to do it:
1. Ensure Bluetooth is Enabled on Your Device
First, ensure that Bluetooth is turned on for your computer or device. If you’re using Windows, go to Settings > Devices > Bluetooth & Other Devices and toggle Bluetooth to “On.” For Mac users, go to System Preferences > Bluetooth and enable Bluetooth.
2. Activate Pairing Mode on Your Mouse
Turn on the mouse and press the Bluetooth pairing button, usually located near the power switch or in the battery compartment. This will make your mouse discoverable by your computer.
3. Pair the Devices
Once Bluetooth is enabled on both your computer and your mouse, your computer will search for nearby Bluetooth devices. Select your mouse from the list, and the two devices will pair.
4. Confirm the Pairing
Once paired, you may be prompted to confirm the connection or enter a passcode (this is rare). After confirmation, the pairing will be complete.
5. Test the Mouse
After pairing, move the mouse to see if the cursor on your screen responds. If the cursor moves, your Bluetooth wireless mouse is installed and ready to use.
Step 4: Troubleshooting Common Installation Problems
Even though installing a wireless mouse is usually straightforward, there are times when things don’t go as planned. Here are some common issues and how to resolve them:
- No Cursor Movement: If your mouse is not responding, check the batteries or ensure the mouse is powered on. You can also try restarting your computer or re-pairing the devices.
- USB Receiver Not Detected: If your computer is not recognizing the USB receiver, try plugging it into a different USB port. You can also try restarting your computer to resolve any connection issues.
- Bluetooth Connection Issues: If your Bluetooth mouse is not connecting, ensure Bluetooth is enabled on both devices. You can also try turning off and on Bluetooth, or unpair and then re-pair the mouse.
Step 5: Customizing Your Wireless Mouse for Optimal Use
Once you have installed your wireless mouse, you may want to customize it for a better user experience:
- Install Driver Software: Some advanced wireless mice come with driver software that allows for more customization. You can download and install the appropriate drivers from the manufacturer’s website.
- Adjust DPI (Dots Per Inch): Many wireless mice offer adjustable DPI settings. Higher DPI means greater precision, which is especially useful for gamers or graphic designers. Use the software provided by the manufacturer to adjust these settings.
- Assign Buttons: If your mouse has extra buttons, you can assign them custom functions using the driver software. This could include tasks like back and forward navigation, opening specific programs, or even controlling media volume.
Step 6: Wireless Mouse Maintenance and Battery Management
To keep your wireless mouse running smoothly, regular maintenance is key:
- Clean the Mouse: Dust and dirt can accumulate on the sensor or buttons. Use a soft cloth or compressed air to clean the mouse regularly.
- Battery Life Tips: To maximize battery life, always turn off your mouse when not in use, especially during long periods of inactivity. Consider using rechargeable batteries to save costs and reduce waste.
BEST BUY!
[content-egg module=AmazonNoApi template=item]
Choosing the Right Wireless Mouse for Your Needs
When considering how to install a wireless mouse, it’s important to choose one that fits your needs. Here are some key factors to consider:
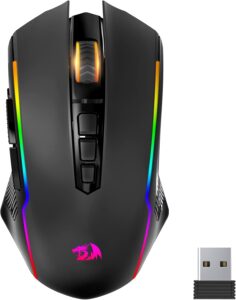
- Ergonomics: If you’re going to be using the mouse for long hours, look for one with an ergonomic design to reduce strain on your wrist.
- DPI: If you’re into gaming or graphic design, a high-DPI wireless mouse provides precision and control.
- Battery Life: Check the battery life of the mouse to ensure it lasts as long as you need it to.
- Additional Features: Some wireless mice offer customizable buttons, silent clicks, or backlighting.
Real User Reviews: What Others Are Saying
“I recently upgraded to a wireless mouse, and the installation was seamless. I loved how easy it was to set up, and now my desk is completely free of cables!” – Mark W.
“The Bluetooth setup took a little time, but once connected, the mouse works flawlessly. The customization options are a big plus for my design work.” – Emily L.
Final Thoughts: The Convenience of Wireless Mice
Now that you know how to install a wireless mouse, you’re all set to enjoy the freedom and flexibility it offers. Whether you’re using a USB receiver or Bluetooth connection, the process is simple and easy. With the added comfort of an ergonomic design and the ability to customize your settings, a wireless mouse is an essential tool for productivity and ease.


Add comment